It was only late in the twentieth century that the accuracy in the measurement of relative humidity became a burning issue. The improvement in technology has brought improvements in many of the other metrology disciplines, but relative humidity was left far behind.
The problem was accentuated by standards writers who believed that relative humidity could be calculated with great accuracy by only using the improvements in the measurement of temperature. This illusion was soon shattered when a document was published in the UK (NAMAS NIS 19) in which the legal traceability in the measurement of relative humidity was defined. Traceability based purely on temperature measurements did not hold water any more. Traceability had to be defined in terms of national humidity standards.
This defined policy has started the great race to establish humidity standards that could really meet the needs of industry. There were many role players both from government agencies as well as industry. This alone made the field of humidity metrology almost unique in the sense that the cooperation between national metrology institutes as equal partners has led to developments not experienced in many of the other disciplines.
The situation in South Africa
In the early nineties it became obvious that there was a growing need for traceable relative humidity calibration in this country. The SABS at the time was already operating a number of testing laboratories where specific accuracies in the conditioning of products were prescribed. It was in the environmental testing laboratory where most of the initial work was done. A handheld thermo-hygrometer and a recording hygrometer were calibrated with the first commercially available saturated salt humidity standards and used to verify the performance of climatic chambers and to calibrate thermo-hygrographs. At the same time the National Metrology Laboratory (NML) at the CSIR acquired a dew-point hygrometer that was declared the national standard for humidity in South Africa, but with very little else to provide a service to industry.
The first accredited humidity laboratories in South Africa
The next developments took place when laboratory accreditation to support calibrations in the humidity discipline became a necessity. There were, however, different schools of thought on this subject! The one approach was to obtain traceability in relative humidity by means of dew point, using a diffusion cell generator as standard. At the time there were no international comparisons and very few of the dew point measuring instruments could be provided with traceable calibration. The question arose whether a generator that could not be verified could be accepted as a traceable standard. This was also a very expensive route to follow. The other approach followed a simpler route. Saturated salt standard capsules with calibration by UK-based laboratories became available and this offered a relatively low-cost solution to traceability in relative humidity. The SABS Humidity Laboratory became the first accredited facility in this discipline in South Africa in 1993, and in an international measurement audit conducted in 1998 the laboratory obtained undisputable evidence that the low-cost approach could meet the requirements at that time.
Further developments
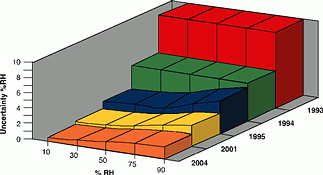
The main aim since the initial accreditation of the SABS laboratory was to improve measurement uncertainties. After the initial accreditation in 1993 at the then unheard best measurement capability (BMC) of ±10%RH the laboratory could quickly prove consistency at ±5%RH. Later it was made possible to improve the BMC of the laboratory to ±5% of the %RH reading. This remained the norm for many years to come. Development in the humidity field did, however, not remain static and the calibration of water activity (relative equilibrium humidity) measurements in the food and pharmaceutical industries became a much-debated topic. In 1998, the laboratory at Protea Electronics became the first in South Africa to add the calibration of water activity and the testing of samples for water activity levels to their accreditation. There was a definite need to improve accuracy in the calibration of water activity instrumentation. The SABS laboratory was the first to apply for improved capabilities based on the use of non-saturated salt standards. By that time the international agreement on key comparisons between national measurement institutes was signed and traceability could be obtained from national standards other than the local one. It was possible to reduce the measurement uncertainties to ±3% of the measured %RH value from 35%RH upwards.
Meanwhile at the National Metrology Laboratory, CSIR
The NML was able to establish a national standards humidity laboratory in 1997 after receiving a grant from the Department of Trade and Industry. A complete dewpoint generating and measurement system was purchased and development on a system embracing first principles was initiated. In more recent years another top class dewpoint hygrometer was added to allow full verification of the original system during each calibration. A special manifold was designed and constructed to allow the relative humidity measuring systems to be linked directly to the dewpoint national standard for humidity. Development work to extend the low level and high-level dewpoint capabilities is currently in progress. On completion, further improvement in the support of traceable relative humidity calibrations may become a reality.
Eleven years down the line...
Measurement techniques have continued to improve and it is now possible to have both reference standards and the devices to be calibrated in the same small cavity for calibration to the same non-saturated standard. This development allows on-site calibration with low-cost instrumentation, devices and standards to close to the same level of accuracy that is possible in a national standards facility. It is at this point where the newly accredited laboratory for relative humidity calibrations at the University of Pretoria makes its appearance. After an 18-month study under varying environmental conditions the laboratory was able to prove consistency in calibration results. The results that can now be obtained (Figure 1) would have verged on the realms of science fiction in 1993, but with a little bit of care this level of accuracy is available to anyone with an interest in high accuracy relative humidity calibrations.

The future
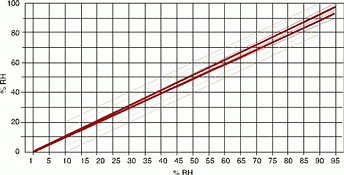
Looking at the graph in Figure 2 and the uncertainty bands (outer ±10%RH, inner bold lines ±2% of %RH reading) it will not be easy to improve on the uncertainties that can now be achieved. It is, however, unlikely that the need for traceability relative humidity calibrations will decline in the near future. Calibration work in this discipline remains a time-intensive process, but this fact alone will not deter those with an interest to contribute to the expansion of activities in an emerging metrology discipline to bring traceable calibration to all those instruments that have had to go without this benefit for so many years. More details on the individual capabilities of the SANAS accredited laboratories with relative humidity as an accredited function can be obtained by visiting the SANAS website.

For more information contact Prof Wimpie Odendaal, The University of Pretoria, 012 420 3545, www.sanas.org

© Technews Publishing (Pty) Ltd | All Rights Reserved