The need for reliable temperature scales as a prerequisite for clear measurement results was already recognised in the early stages of thermometer development. Hence efforts were made to calibrate the thermometers on reference points with good reproducibility.
As it was already easy to represent the freezing point and boiling point of water at the time, these fixed points were quickly used for these purposes (Renaldini 1694). In his temperature scale Fahrenheit assigned the value 0° to the temperature of a sal ammoniac freezing solution, 32° to the temperature of melting ice and +92° to the body temperature of a healthy person. In the temperature scale devised by Réaumur around the same time, 0° is assigned to the freezing point and 80° to the boiling point of water.
The 100° graduation of the temperature scale between freezing and boiling water was proposed for the first time by the Swedish astronomer Celsius in 1742. In contradistinction to the temperature scale named after him and still in use today, Celsius assigned 0° to the boiling point of water and 100° to the freezing point. Eight years later his compatriot Strömer introduced the 'Celsius scale' with the currently still valid assignment of 0°C to the freezing point and 100°C to the boiling point.
With the thermodynamic temperature scale Lord Kelvin devised an easily reproducible scale independent of all substance properties and the temperature level in 1852. This temperature scale based on the second law of thermodynamics has so far been of fundamental importance for definition of the physical quantity 'temperature' and its unit, the Kelvin.
As the gas thermometer measuring methods generally used for determination of the thermodynamic temperature are extremely difficult to apply and technically complicated, a practical temperature scale was established on the basis of international agreements. This International Temperature Scale (ITS) is based on a selected number of easily reproducible physical equilibrium temperatures, so-called fixed points, to which defined values are assigned on the basis of highly accurate measurements.
Interpolation and extrapolation formulae for electrical thermometers, which reproduce the relationship between the temperature of the fixed points and the indication of these instruments, if they have been calibrated at the corresponding fixed points, are set up for the range between these fixed points. The International Temperature Scale is specified by the 'Comité International des Poids et Mésures'. This does not replace the Thermodynamic Temperature Scale, but approximates to it in the best possible way according to the state of thermometry and under practical considerations.
In 1927 the ITS-27 was introduced as the first International Temperature Scale as a common basis for scientific and industrial temperature measurements. It was replaced in 1948 by the IPTS-48 (International Practical Temperature Scale) and further improved in 1960. More accurate gas thermometer measurements sometimes revealed considerable deviations between the scale values laid down in IPTS-48 and the thermodynamic temperature. In addition the valid temperature scale was to be extended towards lower temperatures with the aid of improved thermometers and measuring methods. Hence the International Committee for Weights and Measures drew up the International Practical Temperature Scale as IPTS-68 in 1968.
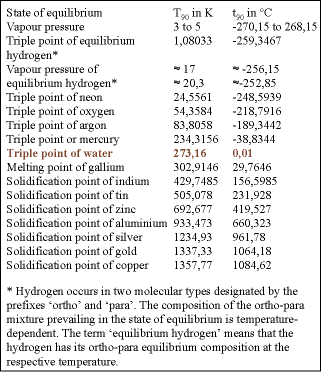
This IPTS-68 was based on 13 fixed points. It extended the temperature scale down to 13,1 K (Kelvin). All fixed points were determined by accurate gas thermometer measurements. The IPTS-68 was evaluated as an important advance with regard to particularly high or low temperatures. In 1990 this temperature scale was superseded by ITS-90 (see table), which approximates to the thermodynamic temperature in an optimum manner within the limits of the currently achievable measuring uncertainties - and is better reproducible in the entire range. The ITS-90 extends from 0,65 K to the highest temperatures measurable on the basis of Planck's radiation law.

For more information: Greg Rusznyak, WIKA Instruments, 011 621 0000, [email protected], www.wika.co.za
| Tel: | +27 11 621 0000 |
| Email: | [email protected] |
| www: | www.wika.co.za |
| Articles: | More information and articles about WIKA Instruments |

© Technews Publishing (Pty) Ltd | All Rights Reserved