

Temperature is one of the most frequently measured parameters in process automation worldwide. So, in order to be able to define and check the accuracy of measurement, global calibration standards had to be established. For temperature, Endress+Hauser adhere to these standards and calibrate industrial resistance sensors and thermocouples according to the ISO/IEC 17025, DKD and SIT guidelines.
Endress+Hauser’s Pyrotemp – a certified and local temperature calibration facility.
Temperature is one of the most frequently measured parameters in process automation worldwide. So, in order to be able to define and check the accuracy of measurement, global calibration standards had to be established. For temperature, Endress+Hauser adhere to these standards and calibrate industrial resistance sensors and thermocouples according to the ISO/IEC 17025, DKD and SIT guidelines.
At Endress+Hauser’s local temperature production facility in Benoni, a calibration laboratory has been established to these exacting standards and is a replica of the calibration laboratories found in all of Endress+Hauser’s temperature sensor production centres around the globe.
Accredited as an ISO9001 facility by the Swiss quality management assessment company SQS Group, Endress+Hauser’s local temperature facility is in the process of acquiring ISO17025 accreditation by the South African National Accreditation System (SANAS). This will make it one of the most advanced temperature calibration facilities in South Africa.
All calibration devices are traceable and certified according to international standards as monitored by the independent authorities DKD and SIT, thereby ensuring the highest calibration quality and accuracy at the facility.
Calibration can be performed by any laboratory, but calibrations to SIT, DKD or SANAS accreditation can only be performed in a certified laboratory and are accepted worldwide.
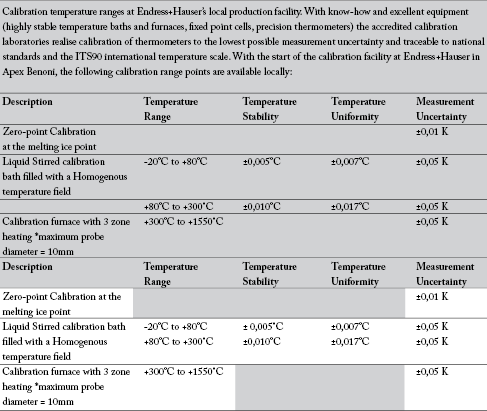
The local facility will soon be able handle temperatures from -20 to 1550°C, one of the widest calibration ranges available in South Africa to these standards.
Temperature sensor calibration methodologies
To understand the importance of accuracy in temperature sensor calibration, it is important to understand the different calibration methodologies and the factors that affect their accuracy.
Calibrating thermometers
Here the phrase calibration generally means the comparison of the measurements from a test piece with corresponding measurements from a very accurate reference using a defined and reproducible measurement procedure. The aim is to define the measurement deviations of the test piece from the true value measured. The basis for a practical temperature measurement and the traceability of thermometer calibration is the International Temperature Scale ITS-90. The scale defines a number of special temperatures, fixed point temperatures, as well as procedures and measurement instruments with which every temperature can be interpolated between fixed points.
Fixed point calibration
Thermometers can be calibrated directly using fixed point temperatures. Essentially these are temperatures that correspond to thermodynamic equilibrium states of pure substances, such as melting/freezing or triple points (the simultaneous appearance of solid, liquid and gaseous phase of a substance). Because fixed point calibration procedures are lengthy they are only used when very high requirements regarding the uncertainty of measurement are required.
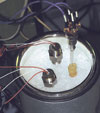
In comparison calibration using the solidification point of water (0°C) is relatively easy to conduct. A water ice mixture is easy to produce and has become the standard calibration procedure for industrial resistance thermometers.
Comparison calibration
For everyday use, thermometers are more frequently calibrated by applying the comparison procedure against reference thermometers that have been indirectly calibrated to the fixed point temperature of the ITS-90 scale using further comparison thermometers. An essential prerequisite for the comparison procedure is that the thermometer to be calibrated and the reference thermometer are as close together as possible in the test medium to ensure they are at the same temperature.
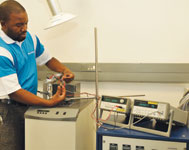
What has been proved and widely accepted is the use of calibration baths filled with liquids or powders as the measurement media. Both thermometers are dipped sufficiently deep and very close to each other into the bath. Stirrers or compressed air keep the liquid or powder in the baths permanently in movement so that a homogeneous temperature distribution is reached within the measurement medium. Special calibrating furnaces are used for higher calibration temperatures. These demand complex control mechanisms and contain heat pipes or solid equalising blocks with high heat conductivity. The required zones, with largely constant and homogeneous temperature distribution for the comparison measurement, are realised by these furnaces.
Importance of temperature ranges and immersion lengths for accurate calibration
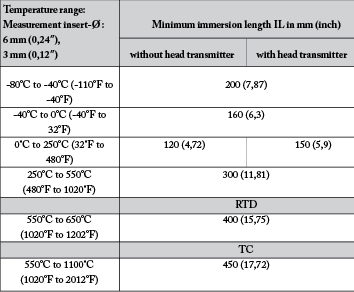
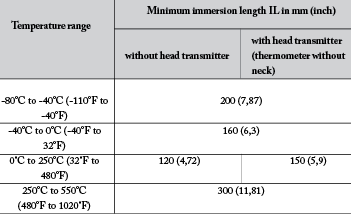
A basic requirement for calibration under reproducible measurement conditions is sufficient thermometer immersion length. The following tables list the minimal immersion lengths (IL) for the calibration of different thermometer types and respective measurement ranges. In principle, a calibration is carried out with the maximum possible immersion length. If the minimum lengths indicated in Tables 1 and 2 cannot be reached, then calibration is no longer possible. In such cases, a thermometer measurement check (evaluation) is carried out instead.
Matching the transmitter to the sensor
In addition to the calibration the measurement accuracy can be optimised by using the sensor transmitter matching technique. To carry out such an optimisation, the possible error sources must first be found. The complete measurement uncertainty arises from the measurement error of the temperature transmitter plus error in the sensor element. It has been found that the largest part of measurement inaccuracy occurs in the sensor, especially at high temperatures. Applying sensor transmitter matching achieves the following:
* High accuracy over a large measurement range.
* Economic alternative to paired sensors, especially at temperatures over 100°C.
* In addition to platinum sensors (Pt) this can also be used for copper-(Cu) and nickel sensors (Ni).
Summary
Demanding processes in most industries, refineries and petrochemical plants rely on maximising the amount of process quality. Since temperature measurement plays such a decisive role both in quality and plant safety, the individual components of the temperature measurement point are subject to careful examination by Endress+Hauser in its own test facilities. The quality of the materials, testing and knowledge of thermometer systems is proved by testimonials and certificates that can be traced back for years. The implementation of the new South African calibration facility at Endress+Hauser Pyrotemp will meet the increasing demand for quality in the local industrial market through the provision of high quality, traceable calibration services.
For more information contact Hennie Blignaut, Endress+Hauser, +27 (0)11 262 8000, [email protected], www.za.endress.com
| Tel: | +27 11 262 8000 |
| Fax: | +27 11 262 8062 |
| Email: | [email protected] |
| www: | www.endress.com |
| Articles: | More information and articles about Endress+Hauser South Africa |
© Technews Publishing (Pty) Ltd | All Rights Reserved